
Table of Contents
ToggleFitting both a tub and shower into a small bathroom isn’t just possible, it’s becoming a smart design standard that homeowners actually want. The key is thinking vertically, choosing the right fixtures, and planning your layout before you swing a hammer. Whether you’re dealing with a cramped master bath or a guest half-bath that needs an upgrade, these seven practical ideas will help you squeeze both essentials into your space without it feeling like a closet. Most of these projects are DIY-friendly, though some structural changes may require a permit or a licensed plumber.
Key Takeaways
- Small bathroom remodel ideas succeed when you prioritize vertical space, compact fixtures like Japanese soaking tubs and corner showers, and strategic layout planning before construction begins.
- Combine a Japanese soaking tub with a wet room shower or walk-in tub with shower doors to maximize usable space without requiring two separate units.
- Keep plumbing drains in their original locations to avoid expensive relocations, and follow building code rough-in dimensions (shower valve at 48 inches, tub spout at 24 inches from the finished floor).
- Install recessed niches, floating vanities, and minimal shelving to keep countertops clear and prevent visual clutter that makes small bathrooms feel even smaller.
- Proper ventilation with a correctly sized exhaust fan (1 CFM per cubic foot of bathroom volume) and exterior ducting prevents mold and moisture damage that can cost thousands in repairs.
- Use light wall colors, large-format tile placed vertically, oversized mirrors, and glass shower enclosures to reflect light and create the illusion of more space in your small bathroom.
Maximize Space With Compact Fixtures and Combination Units
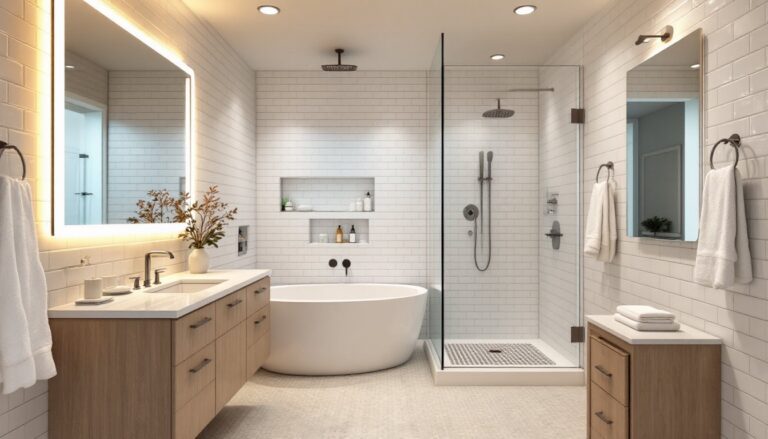
When square footage is tight, your fixture choices make all the difference. Japanese soaking tubs (usually 48–54 inches long but deeper) or corner alcove tubs take up less floor space than a standard 60-inch bathtub while still offering functionality. Pair one with a compact shower enclosure, a 36-inch corner shower stall or even a neo-angle corner shower leaves room for movement and storage.
If you’re open to it, a Japanese soaking tub plus a wet room shower (floor-level with a drain slope) maximizes usable space by combining both water zones without a separate enclosure. This approach requires careful waterproofing of the entire floor (use cement backerboard and a quality moisture barrier), but it’s doable for a motivated DIYer with plumbing knowledge.
Another compact option: a walk-in tub with shower doors. These fixtures come with built-in seats and doors that open inward, designed specifically for small bathrooms. They’re pricier upfront but eliminate the need for two separate units. Standard widths run 28–32 inches, fitting into tight spaces where traditional tubs won’t.
Before ordering, measure your doorway width and the path from entry to bathroom. A 60-inch tub won’t fit if your door is only 28 inches wide. Acclimate materials (tile, grout, fixtures) to your bathroom’s temperature and humidity for 48 hours before installation, wood swells, metal expands, and getting dimensions right matters.
Choose a Layout That Works: Corner Tubs, Alcove Showers, and Wet Rooms
Layout is everything in a small bathroom. A corner bathtub saves floor space by using two walls as the tub surround, leaving your floor plan open and less cluttered. Pair it with a corner or alcove shower on the opposite wall, and you’ve created two distinct zones without eating up the center of the room.
Alcove showers (three-wall enclosures with a single entrance) are the traditional choice and the easiest to install if you’re retrofitting. They require a curb or threshold, which adds a tripping hazard but is simpler than sloping an entire bathroom floor. A standard alcove is 36×36 or 36×42 inches, tight but functional.
Wet rooms take a different approach: no separate tub or shower enclosure, just a floor sloped toward a central drain. The entire room becomes a shower space. This requires significant plumbing work and waterproofing, sloping the floor to proper pitch (1/8 inch per linear foot per building code), installing a pre-formed drain pan, and sealing everything properly. It’s not beginner territory, but it genuinely maximizes usable space and looks clean and modern.
When designing your layout, remember that plumbing moves are expensive. If you can keep the drain locations where the previous fixtures sat, you’ll save labor and headaches. Rough-in dimensions matter: your shower valve should be 48 inches from the finished floor for a standard installation, and your tub spout usually sits at 24 inches. Check your local building codes, requirements vary by jurisdiction.
Many homeowners find inspiration on design platforms like Houzz, which hosts both professional portfolios and real homeowner photos of completed small bathrooms.
Storage Solutions That Keep Clutter at Bay
Small bathrooms need smart storage, or they feel instantly cramped. Avoid the temptation to load shelving above the toilet or tub, it works temporarily but creates visual chaos and makes cleaning harder. Instead, think recessed.
Recessed niches (wall cavities set into the shower or above the vanity) hold towels, soap, and toiletries without eating floor space. A standard niche is 12×24 inches: install it during framing or use a retrofit niche kit if you’re working with existing walls. Waterproof the interior with a moisture-resistant membrane if it’s in the shower zone.
Floating vanities mounted to studs (not the floor) open up sight lines and make the room feel bigger. Pair one with an under-sink cabinet (29–36 inches tall, 24 inches deep) and use vertical space above the toilet for a narrow cabinet or shelving tower (12 inches wide or less). Keep finishes light and minimal, too many colors and styles make small spaces feel disorganized.
If you’re installing a custom vanity, work with actual measurements: a 24-inch deep vanity is standard and fits most small bathrooms: 18 inches is cramped for daily use. A 30–36 inch wide vanity fits against most bathroom walls without blocking circulation.
Storage doesn’t have to be expensive. A few adhesive shelves or a tension rod and baskets inside a corner can solve the problem without construction. The goal is keeping countertops clear, clutter reads as mess, and in a small space, that translates to feeling even smaller.
Lighting and Ventilation for Functionality and Comfort
Lighting in small bathrooms must be bright and layered. A single ceiling fixture leaves dark corners and shadows that make the space feel dingy. Install recessed lights (4-inch or 6-inch cans, spaced 4–6 feet apart) for ambient light, then add LED strips under the floating vanity or a lighted mirror for task lighting. LED uses less energy, runs cooler, and doesn’t overheat small spaces.
Color temperature matters: 3000K to 4000K light (warm white to neutral white) is easier on the eyes than harsh 5000K daylight-simulation bulbs. Use dimmers where code allows, they’re inexpensive to install and let you adjust mood and energy use.
Ventilation is non-negotiable. Moisture trapped in a small bathroom breeds mold, damages drywall, and rots wood framing. Your exhaust fan must be properly sized and installed. The rule of thumb: 1 CFM (cubic feet per minute) per cubic foot of bathroom volume. A 40-square-foot bathroom with 8-foot ceilings needs roughly a 320 CFM fan. Bathroom exhaust fans run between 50 and 150 CFM: use the sizing chart on the box or in the manual.
Run the ductwork in rigid aluminum or vinyl (not flexible aluminum, which traps moisture), sloped slightly toward the exterior to prevent condensation backflow. Duct your fan to an exterior wall or roof penetration, never into an attic or soffit, you’ll move the moisture problem, not solve it. Install a damper or check valve to prevent outdoor air and insects from coming back in.
Many building codes require exhaust fans to run for at least 20 minutes after the shower (check your local IRC or IRC equivalent). A timer switch is cheap insurance and prevents mold growth.
Design Finishes That Amplify Your Space
The right finishes make a small bathroom feel larger. Light, neutral wall colors (whites, soft grays, pale greiges) reflect light and open up the space visually. Paint is the cheapest refresh: use a semi-gloss or satin primer-in-one product designed for bathrooms (it resists moisture better than flat finishes). Plan for 150–200 square feet of coverage per gallon on primed walls: subtract the areas taken by fixtures and windows.
Large-format tile (12×24 or larger) on walls and floors reads as fewer grout lines, which simplifies the visual space. A 12×24 subway tile placed vertically on the shower walls adds height and breaks up the box feeling of a small enclosure. Stick to two or three tile colors, mixing too many creates visual clutter.
Matte or honed finishes feel less institutional than shiny glazed tile: they’re also less slippery on wet floors (important for safety and insurance). Use a mosaic or textured floor tile (never smooth ceramic or large glossy tiles on a shower floor, they’re slipping hazards). Your tile must be rated for wet areas: porcelain over cement backerboard, never drywall.
Mirrors are your secret weapon. A single oversized mirror above the vanity (48 inches or wider) bounces light around and erases the box. Frameless mirrors feel more open: framed options add style but consume visual space. If you have a focal wall, consider a glass shower enclosure with minimal framing instead of an opaque surround, the transparency keeps sightlines open.
Countertops see heavy moisture. Porcelain or quartz are durable and easy to seal. Avoid unsealed wood or laminate: they swell with moisture and fail quickly. Many remodeling cost guides break down material pricing by region and durability, helpful when budgeting finishes.
Budget-Friendly Tips for DIY Implementation
Remodeling a bathroom runs 15,000–40,000 dollars depending on size, materials, and labor. DIY work cuts labor costs but requires time, tools, and honest self-assessment. Paint, tile, fixtures, and some plumbing you can handle. Structural walls, load-bearing work, and licensed gas/electrical lines? Hire a professional. Your local building department can tell you what requires permits: some jurisdictions require one for any bathroom work.
Demo and prep are 50% of the success. Remove old tile carefully (use a cold chisel, hammer, and eye protection, flying tile chips are serious). Patch and level the substrate. Prime everything. Rushing here means your new tile won’t stick or your paint will peel.
Prioritize spending on fixtures and waterproofing. A cheap faucet leaks. Poor waterproofing causes mold and expensive repairs. A $300 quality Delta or Kohler faucet lasts 20 years: a $50 knockoff might last 3. Waterproofing membrane and backerboard aren’t glamorous, but they’re the backbone of a lasting bathroom.
Reuse what works. If your existing framing, plumbing rough-in, and electrical are sound, keep them. Replace only what needs replacing. This cuts material costs and time.
Materials fluctuate by region and season. Tile, lumber, and fixtures cost more in spring (peak remodeling season) than fall. Budget 10–20% contingency for unknowns discovered during demo (hidden water damage, structural issues, code upgrades). The home renovation ideas guide here covers the difference between renovation and remodeling costs and scope, which helps frame your project realistically.
Conclusion
A small bathroom with both a tub and shower is achievable when you plan the layout first, choose compact fixtures, and nail the details, waterproofing, ventilation, and substrate prep. Start with a clear measurement and a rough sketch: visit showrooms to see alcove tubs and corner showers in person. Be honest about your skill level and when to call a plumber or electrician. With smart design and realistic expectations, you’ll create a functional, attractive bathroom that doesn’t feel like a shoebox.